Sopapilla Cheesecake Bars Recipe
- Time: Active 15 minutes, Passive 30 mins, Total 45 minutes
- Flavor/Texture Hook: A shatter crisp cinnamon top meets a velvety, rich cream cheese center
- Perfect for: Potlucks, holiday parties, or a reliable crowd pleaser for baking beginners
- The Ultimate Sopapilla Cheesecake Recipe
- Crunchy Cinnamon Meets Velvety Filling
- Science Behind The Golden Crunch
- Timing For Best Baking Results
- Alchemy Of Selecting Dessert Elements
- Essential Tools For Flawless Baking
- Step By Step Golden Perfection
- Avoiding Common Baking Mistakes
- Creative Ways To Customize Bars
- Preserving Crunch And Creamy Integrity
- Finishing Touches For Baked Goods
- Recipe FAQs
- 📝 Recipe Card
The Ultimate Sopapilla Cheesecake Recipe
The moment that scent hits you that heady, nostalgic mix of scorched cinnamon and melting butter you know you're in trouble. I first encountered this dish at a neighborhood potluck where it was gone before I could even grab a fork.
I spent months trying to replicate that specific "shatter to velvet" ratio, failing several times with soggy bottoms and lumpy fillings, until I realized the secret wasn't just the cheese, but how the butter interacts with the sugar under high heat.
When you pull this out of the oven, the top should be a landscape of bubbling, golden ridges that crackle when you touch them. It's the kind of dessert that makes people quiet down and focus entirely on the crunch.
Honestly, don't even bother with the low-fat cream cheese here; we've tested it, and it just doesn't provide the structural integrity needed to stand up to the flaky dough.
We're going to master the balance of textures today. You'll learn how to treat the dough sheets so they don't separate and how to get that signature sopapilla "rise" without a deep fryer in sight.
It's a reliable, tested method that I've refined over dozens of batches, so let's get into the kitchen and make something truly memorable.
Crunchy Cinnamon Meets Velvety Filling
This dish is a clever architectural feat. It uses refrigerated crescent dough not just as a shortcut, but as a specific tool to mimic the airy, laminated structure of a traditional sopapilla.
While a standard cheesecake relies on a crumbly graham cracker base, this sopapilla cheesecake recipe utilizes a "double crust" system that traps the moisture of the filling, steaming the bottom layer while the top layer fries in butter and sugar.
The internal layer is less like a fluffy New York cheesecake and more like a dense, silky custard. By adding a single egg to the cream cheese mixture, we ensure the center sets firmly enough to be cut into clean, handheld bars. It's the perfect middle ground between a pie and a cake, making it incredibly easy to serve at large gatherings. If you appreciate this style of creamy dessert, you might also find the texture similar to the one found in this Silky Cherry Cheesecake recipe.
Science Behind The Golden Crunch
Vapor Pressure Management: The sugar and butter on the top layer create a semi permeable seal, forcing the moisture from the cream cheese to stay trapped within the dough layers. This prevents the filling from drying out while simultaneously "frying" the top crescent sheet in its own fat.
Sugar Crystallization: As the honey and sugar melt together with the butter, they undergo a rapid dehydration process. This creates a glass like lattice on the surface that provides the characteristic "shatter" when bitten into, rather than a soft, doughy finish.
| Cook Method | Time | Texture | Best For |
|---|---|---|---|
| Standard Oven | 30 mins | Balanced crunch | Large batches and parties |
| Convection Oven | 24 mins | Extra crisp top | If you prefer a darker crust |
| Air Fryer (Halved) | 18 mins | Maximum shatter | Quick small batch cravings |
Similar to the precision required in a Custard Bread Pudding recipe, managing the thermal finish of the egg based center is what separates a good bake from a masterful one. You want the center to wiggle slightly when the pan is shaken, as the residual heat will finish the cooking process during the cooling phase.
Timing For Best Baking Results
Precision is everything when you're working with laminated dough and dairy. You're looking for three specific numeric checkpoints during this process. First, ensure your cream cheese is exactly at room temperature, which usually takes about 2 hours on the counter.
Cold cheese is the primary cause of a lumpy, unattractive filling.
Second, the oven must be preheated to 350°F (180°C) for at least 15 minutes before the tray goes in. Finally, the cooling period is non negotiable.
You need at least 30 mins of room temperature cooling followed by 2 hours in the fridge. Cutting into this while warm is a mistake I once made the filling will simply run out like a sauce rather than staying in neat, velvety layers.
Alchemy Of Selecting Dessert Elements
| Ingredient | Science Role | Pro Secret |
|---|---|---|
| Cream Cheese | Provides the fat heavy, silky structure | Always use full fat blocks, never the tub variety |
| Crescent Dough | Creates the laminated, airy layers | Keep it in the fridge until the exact second you need it |
| Pure Vanilla | Acts as a flavor enhancer for the dairy | Use paste if you want those beautiful dark speckles |
| Honey | Lowers the caramelization point of the topping | Drizzle in a zigzag pattern to prevent "sugar spots" |
For The Crust Layer
You'll need 2 cans (8 oz each) of refrigerated crescent roll dough sheets. If you can only find the rolls with perforated triangles, just pinch the seams together tightly. Why this? It provides the leavening needed for that signature puff.
For The Velvet Filling
Gather 16 oz of full fat cream cheese, 1 cup of granulated sugar, and 1 large egg. Why this? The egg binds the fats, preventing the cheesecake from "weeping."
For The Golden Seal
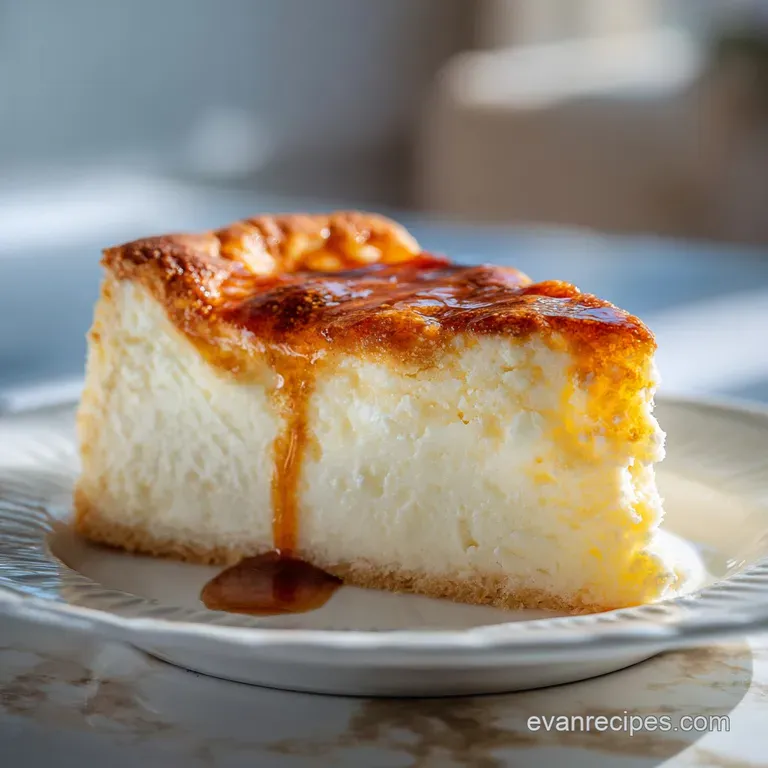
You'll need 1/2 cup of melted unsalted butter, 1/2 cup of granulated sugar, and 1.5 tbsp of ground cinnamon. Finally, 2 tbsp of honey for the finish. Why this? Cinnamon sugar creates the iconic sopapilla flavor profile.
Essential Tools For Flawless Baking
To get the best results, you'll want a 9x13 inch glass or ceramic baking dish. Metal pans conduct heat more aggressively, which can lead to the edges of your dough burning before the center of the cheesecake is set.
A hand mixer or stand mixer is also vital; trying to whisk 16 oz of cream cheese by hand will leave you with tiny white lumps that won't disappear in the oven.
Chef's Note: I always use a silicone spatula to scrape the bottom of the bowl. It's the only way to ensure the egg and sugar are fully integrated into the fat of the cheese.
step-by-step Golden Perfection
- Preheat your oven to 350°F (180°C). Note: Proper preheating ensures the dough begins to puff immediately upon entry.
- Prepare the base by unrolling one can of dough and pressing it into the bottom of a 9x13 pan. Note: Stretch it gently to the corners without tearing.
- Cream the cheese using your mixer on medium speed for 2 minutes. Add 1 cup of sugar and the vanilla.
- Incorporate the egg into the cheese mixture. Note: Mix only until the yellow streaks disappear to avoid over aerating.
- Spread the filling over the bottom dough layer. Use a spatula to get an even, silky surface.
- Top with dough using the second can. Note: Lay it gently on top of the cheese; don't press down or the filling will squeeze out.
- Apply the butter by pouring the 1/2 cup of melted butter evenly over the top dough sheet.
- Season the surface by mixing the remaining 1/2 cup of sugar with the cinnamon and sprinkling it generously over the butter.
- Bake 30 mins until the top is golden and the aroma fills the room.
- Apply the honey immediately after removing from the oven while the top is still sizzling.
Avoiding Common Baking Mistakes
One of the biggest pitfalls is the "dough gap," where the top layer shrinks away from the edges. To prevent this, make sure the top sheet of dough is slightly larger than the pan so you can "tuck" it in. Another issue is the soggy bottom layer.
If your oven has a bottom heating element, place the rack in the lower third of the oven for the first 10 minutes, then move it to the center.
Why Your Cheesecake Cracked
If the temperature of the filling rises too quickly, the egg proteins contract and pull apart, causing a crack. This usually happens if you bake at a temperature higher than 350°F.
| Problem | Root Cause | Solution |
|---|---|---|
| Lumpy Filling | Cold cream cheese | Beat cheese alone before adding sugar |
| Top is oily | Butter didn't emulsify | Sprinkle cinnamon sugar BEFORE the butter is cold |
| Dough is gummy | Underbaked center | Bake until the center reaches 150°F internally |
Common Mistakes Checklist
- ✓ Pat the baking dish dry before adding the first dough layer (prevents steaming).
- ✓ Scrape the mixing bowl sides every 30 seconds to avoid unmixed cheese pockets.
- ✓ Don't overbeat the egg; extra air causes the cheesecake to rise and then collapse.
- ✓ Let the bars sit at room temperature for 30 minutes before moving to the fridge.
- ✓ Use a sharp, wet knife to cut the bars for clean, professional edges.
Creative Ways To Customize Bars
The Churro Twist
If you want to lean into the "fried" aspect, increase the cinnamon to 2 tbsp and add a pinch of nutmeg to the topping. This gives it a deeper, more spiced flavor that mimics street style churros.
Berry Infusion Idea
Swirl 1/2 cup of raspberry preserves into the cream cheese filling before adding the top dough layer. The acidity of the berries cuts through the richness of the cheese and the sweetness of the cinnamon topping beautifully.
dairy-free Swap
You can use plant based cream cheese and a vegan butter substitute. Note: The texture will be slightly softer, so increase the refrigeration time to 4 hours to ensure it sets properly.
Preserving Crunch And Creamy Integrity
These bars actually taste better on the second day as the flavors have time to meld, but the texture of the top dough is at its peak within 6 hours of baking. To store, keep them in an airtight container in the fridge for up to 4 days.
If you want to keep them longer, they freeze remarkably well for up to 2 months. Just wrap individual bars in plastic wrap then foil.
To reuse your scraps or leftovers, you can actually chop up any broken edges and fold them into vanilla bean ice cream. The bits of cinnamon sugar crust act like "mix ins" that stay crunchy even when frozen.
| Servings | Ingredient Adjustments | Pan Size | Cook Time |
|---|---|---|---|
| 8 people | Use 1 can dough, 8oz cheese, 1/2 egg | 8x8 square | 25 mins |
| 16 people | Use 2 cans dough, 16oz cheese, 1 egg | 9x13 pan | 30 mins |
| 32 people | Use 4 cans dough, 32oz cheese, 2 eggs | Two 9x13 pans | 35 mins |
Finishing Touches For Baked Goods
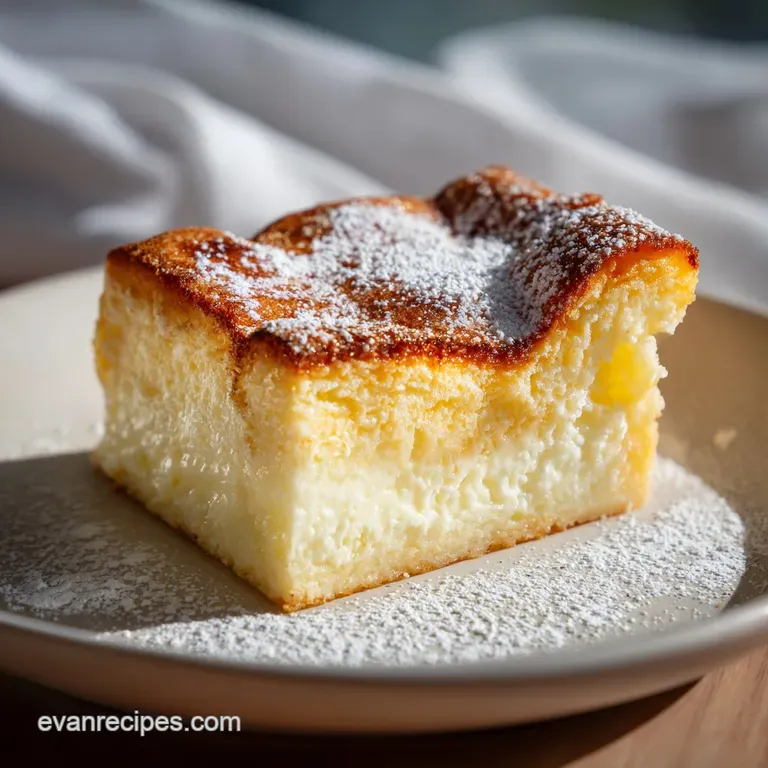
While these bars are spectacular on their own, a few small tweaks can make them look like they came from a high end bakery. I like to wait until the honey has slightly cooled and then hit the top with a very light dusting of powdered sugar. It highlights the peaks and valleys of the flaky crust.
Serve these on a dark platter to make the golden brown color pop. If you're feeling fancy, a small sprig of mint or a single fresh raspberry on each square adds a touch of color that contrasts with the warm tones of the cinnamon. Remember, the first bite is with the eyes, but that first crunch is what they'll remember.
Cinnamon Sugar Vapor Pressure
The interaction between the fat in the butter and the granules of sugar creates a barrier that traps steam. This is why the top layer of dough puffs up so dramatically compared to the bottom layer.
The Carry Over Chill
Even after you pull the pan from the oven, the eggs in the center are still cooking. If you wait until the center is completely firm before pulling it out, the final product will be rubbery once it's actually cold. Pull it when it's still slightly "jiggly" like gelatin.
The Butter Emulsification Myth
Some people think you need to whisk the butter into the sugar before topping. Truthfully, pouring the butter first and then topping with sugar allows the sugar to sit on the surface, creating a more pronounced crunch. Mixing them beforehand often results in a heavier, more syrupy topping that can weigh the dough down.

Recipe FAQs
Do you need eggs for sopapilla cheesecake?
Yes, one large egg is crucial. The egg acts as a binder for the cream cheese filling, ensuring it sets firmly during baking and cooling, preventing it from running out.
What is the secret to a creamy cheesecake layer?
Use full fat cream cheese that is completely softened to room temperature. Cold cheese mixes poorly, leading to lumps; this is the same principle needed for achieving perfect texture when making your Silky Cherry Cheesecake recipe.
Are you supposed to refrigerate sopapilla cheesecake?
Yes, a long refrigeration period is mandatory for clean slicing. Allow it to cool at room temperature for 30 minutes, then refrigerate for a minimum of 2 hours before cutting into bars.
Do you use salted or unsalted butter for sopapilla cheesecake?
Unsalted butter is highly recommended for the topping. This gives you precise control over the final salt content, as the cinnamon sugar topping is already quite sweet.
How to prevent the top layer of crescent dough from shrinking away from the edges?
Gently tuck the edges of the top dough sheet down around the filling. This technique traps the steam, forcing the top layer to puff up rather than retracting as it bakes.
Is it true I must use a glass baking dish for this recipe?
No, this is a common misconception, but glass is preferred. Glass or ceramic dishes conduct heat more gently than metal, which helps prevent the bottom dough layer from burning before the creamy center is fully set.
What temperature should my oven be for baking?
Bake at 350°F (180°C) for approximately 30 minutes. Ensure your oven is fully preheated for at least 15 minutes before inserting the pan so the dough starts puffing immediately.
Sopapilla Cheesecake Bars

Ingredients:
Instructions:
Nutrition Facts:
| Calories | 329 kcal |
|---|---|
| Protein | 3.3 g |
| Fat | 20.8 g |
| Carbs | 33.3 g |
| Fiber | 0.4 g |
| Sugar | 21.1 g |
| Sodium | 138 mg |
