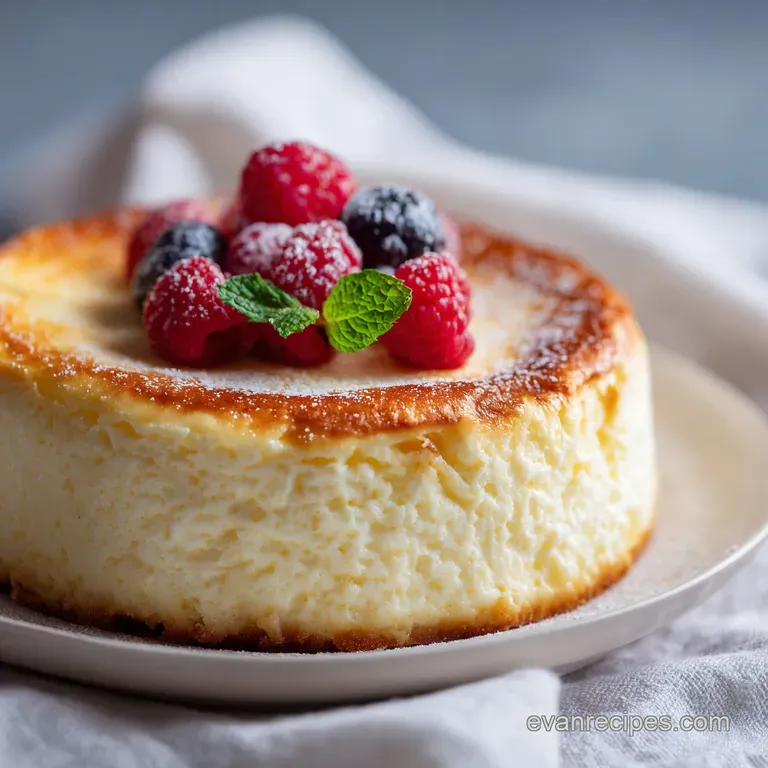
High Protein Cottage Cheese Cheesecake
- Time: Active 10 minutes, Passive 45 minutes, Total 55 minutes
- Flavor/Texture Hook: Tangy, velvety center with a nutty almond shatter
- Perfect for: Post workout treats, high protein meal prep, or guilt free late night snacks
- Mastering the cottage cheese yogurt egg cheesecake
- Why This Specific Method Works
- Component Analysis and Selection
- Essential Ingredients and Swaps
- Vital Baking Tools Required
- Perfect Baking Step Sequence
- Solving Common Baking Failures
- Texture and Scaling Adjustments
- Myths Regarding Protein Baking
- Freshness and Storage Tips
- Serving Style and Pairings
- Recipe FAQs
- 📝 Recipe Card
Mastering the cottage cheese yogurt egg cheesecake
There is nothing quite as disappointing as pulling a "healthy" dessert out of the oven only to find it has the texture of wet sponge or, worse, grainy scrambled eggs. I remember the first time I tried to bake with cottage cheese. I didn't use a blender, thinking the heat would melt the curds. It didn't.
I ended up with a lumpy, weeping mess that tasted fine but felt like eating a science experiment gone wrong. It was a total failure that almost turned me off from high protein baking forever.
But then, I started treating it like a custard rather than a standard cake. The secret isn't just in the ingredients; it is in the physics of the batter. When you finally get that cottage cheese yogurt egg cheesecake right, it is a revelation.
The aroma of toasted almond flour and warm vanilla fills the kitchen, and when you slice into it, the knife glides through a dense, silky interior that feels indulgent. It is the perfect marriage of tart Greek yogurt and the rich, savory undertones of the cheese.
We are going for a specific contrast here: a crisp, buttery base against a cool, creamy filling. This yogurt egg cheesecake is designed for those who love the tang of a classic cheesecake but want something that feels lighter on the stomach.
We’ve tested this version dozens of times to make sure the ratios are exactly right so you don't end up with a rubbery bake. Let's get into why this specific method produces such a reliable result.
Why This Specific Method Works
- High Speed Emulsification: Blending the cottage cheese and yogurt for a full 60 seconds breaks down the casein proteins and fats into a uniform liquid, preventing a grainy or "curdled" mouthfeel after baking.
- Low Velocity Egg Incorporation: Adding eggs at the very end on the lowest setting prevents air bubbles from forming; too much air causes the cheesecake to rise like a souffle and then collapse into a wrinkled mess.
- Thermal Stability: The combination of Greek yogurt and cottage cheese provides a high moisture content that protects the egg proteins from overcoagulating, keeping the center velvety rather than rubbery.
- Residual Heat Finishing: By pulling the cake when the center still jiggles, we allow carryover cooking to finish the set perfectly without drying out the edges.
| Method | Time | Texture | Best For |
|---|---|---|---|
| Standard Oven | 45 minutes | Uniformly dense and creamy | Traditional cheesecake lovers |
| Water Bath | 55 minutes | Ultra silky and pale | Preventing any surface cracks |
| Stovetop (Steam) | 40 minutes | Soft and mousse like | A quick, small batch snack |
The choice between a standard bake and a water bath often comes down to how much you care about the aesthetic of the top surface. For this cottage cheese yogurt, a standard 325°F (160°C) oven provides enough gentle heat to set the proteins without the extra hassle of a boiling water tray. If you are looking for that classic "snap" in your dessert, you might also enjoy the textural contrast found in a Sopapilla Cheesecake Recipe which uses a different structural approach.
Component Analysis and Selection
| Ingredient | Science Role | Pro Secret |
|---|---|---|
| low-fat Cottage Cheese | Provides structural protein | Use small curd for easier blending into a smooth liquid |
| Greek Yogurt (2%) | Adds acidity for tang | Strain for 10 mins if it looks watery to prevent a soggy base |
| Large Eggs | Binds the fats and liquids | Must be room temperature to emulsify properly with the fats |
| Almond Flour | Creates a gluten-free crust | Toast the flour in a dry pan for 2 mins for a deeper flavor |
The interaction between the acidic yogurt and the alkaline cottage cheese creates a balanced pH that helps the eggs set into a stable matrix. This is why the specific type of yogurt matters; 2% fat provides just enough lipids to coat the tongue without making the cake feel greasy.
Essential Ingredients and Swaps
The beauty of this recipe lies in its simplicity. We are using 2 cups (450g) of low-fat cottage cheese as our primary base. Why this? It provides the high protein structure and a mild savory note that balances the sweetness. You'll also need 1 cup (245g) of Plain Greek Yogurt.
I prefer the 2% fat version because it strikes the best balance between creamy and light.
For the binding and sweetness, we use 3 large eggs and 0.5 cup (120ml) of maple syrup. The eggs are the "glue" that holds everything together. Why this? Eggs provide the lecithin needed to keep the water and fat from separating during the bake. We round out the flavor with 2 tsp pure vanilla extract, 1 tbsp fresh lemon juice, and a pinch of sea salt to make the flavors pop.
For the base, 1.5 cups almond flour mixed with 3 tbsp melted coconut oil and 1 tbsp granulated sweetener creates a crumbly, nutty foundation.
| Original Ingredient | Substitute | Why It Works |
|---|---|---|
| Maple Syrup | Honey | Similar viscosity; makes the cake slightly browner and sweeter |
| Almond Flour | Oat Flour | Provides a heartier, grain like texture; keeps it nut free |
| Coconut Oil | Unsalted Butter | Adds a classic dairy richness and better browning to the crust |
| Greek Yogurt | Skyr | Even higher protein and thicker consistency; yields a denser cake |
If you find yourself out of maple syrup, honey is a great backup, though it does have a stronger floral note. The lemon juice is non negotiable; it acts as a brightener that cuts through the richness of the dairy. For those who need a completely grain free option, this gluten-free Cheesecake offers another perspective on achieving that perfect silky texture without traditional flour.
Vital Baking Tools Required
You don't need a professional kitchen, but a high speed blender is the one tool that makes or breaks this dish. A standard food processor can work, but it often leaves tiny bits of cottage cheese curd behind. You want the blades to move fast enough to turn that cheese into a liquid that looks like heavy cream.
An 8 inch springform pan is also essential. Because this cottage cheese yogurt egg cheesecake is quite delicate when it first comes out of the oven, trying to flip it out of a standard cake tin is a recipe for disaster. The removable sides allow you to release the cake safely once it has chilled and firmed up.
I also recommend a piece of parchment paper for the bottom to ensure no sticking occurs.
Finally, a wire cooling rack is helpful. If you leave the hot pan on a flat countertop, the heat gets trapped underneath, creating steam that can make your crust soggy. Lifting it up allows air to circulate, ensuring the bottom stays as crisp as the day it was baked.
Perfect Baking Step Sequence
- Prepare the vessel. Line an 8 inch springform pan with parchment paper and preheat your oven to 325°F (160°C). Note: Parchment is better than just greasing because it prevents the delicate crust from tearing.
- Blitz the dairy. Place 2 cups cottage cheese, 1 cup Greek yogurt, 0.5 cup maple syrup, 1 tbsp lemon juice, 2 tsp vanilla, and 0.25 tsp salt into the blender.
- Emulsify completely. Pulse on high for 60 seconds until the mixture is completely liquid and shows no visible curds.
- Add the binders. Add 3 room temperature eggs to the blender one at a time.
- Mix gently. Pulse on the lowest setting just until the yellow streaks disappear. Note: This prevents over aeration which causes cracking.
- Construct the base. Combine 1.5 cups almond flour, 3 tbsp melted coconut oil, and 1 tbsp sweetener; press firmly into the pan bottom.
- Combine and level. Pour the cheesecake batter over the base and tap the pan gently on the counter to release any trapped bubbles.
- The Bake. Bake for 45 to 50 minutes until the edges are set and slightly pulling away, but the center still jiggles.
- The Cool Down. Remove from the oven and let it sit on the counter for 1 hour.
- The Final Set. Chill in the refrigerator for at least 4 hours, or ideally overnight, before slicing.
Solving Common Baking Failures
Why Your Cheesecake is Grainy
If your cake feels like it has tiny sand particles in it, the culprit is almost always the cottage cheese curds. Even if you think you’ve blended it enough, the proteins can clump back together if the ingredients were too cold when they hit the blender.
The fix is simple: ensure your yogurt and cheese sit out for 20 minutes before blending, and don't stop the blender until the liquid is 100% smooth.
Why Your Surface Cracked
Cracks usually happen for two reasons: over mixing the eggs or over baking the cake. When you whip eggs, you trap air. That air expands in the oven and then shrinks as it cools, pulling the surface apart.
Plus,, if the internal temperature goes too high, the egg proteins tighten up and squeeze out moisture, causing a split.
| Problem | Root Cause | Solution |
|---|---|---|
| Soggy Crust | Moisture from yogurt seeping down | Pre bake the crust for 8 mins at 350°F before adding filling |
| Rubber Center | Too much heat or over baking | Pull the cake when the center 2 inches still look like Jell O |
| Leaking Batter | Springform pan seal is loose | Wrap the bottom of the pan in heavy duty foil before baking |
Common Mistakes Checklist
- ✓ Never skip the blender step; whisking by hand will never yield a smooth result.
- ✓ Use room temperature eggs to ensure a stable emulsion with the cold dairy.
- ✓ Do not open the oven door during the first 30 minutes of baking; the temp drop can cause a collapse.
- ✓ Let the cake cool completely at room temperature before moving it to the fridge to prevent condensation.
- ✓ Use a sharp, thin knife dipped in hot water to get those clean, professional looking slices.
Texture and Scaling Adjustments
If you are cooking for a larger group, this recipe scales up beautifully. To double the recipe (16 servings), use a 10 inch springform pan. You will need to increase the bake time by about 15 minutes because the depth of the batter will be greater.
Be careful with the spices and salt; when doubling, I usually only increase the salt by 1.5x to keep the flavors from becoming too sharp.
For a smaller batch, you can halve the ingredients and bake them in a standard loaf pan or even in individual ramekins. Ramekins are a fantastic way to do "portion control" meal prep. If you use 6oz ramekins, the bake time drops significantly to about 20-25 minutes.
Just watch for that signature jiggle in the center to know they are done.
When scaling down, the biggest challenge is the eggs. If a halved recipe calls for 1.5 eggs, crack two eggs into a bowl, whisk them together, and then measure out half by weight or volume. This ensures the fat to protein ratio remains consistent, which is vital for the structure of this yogurt egg cheesecake.
Myths Regarding Protein Baking
One common misconception is that "low-fat" dairy always results in a dry cake. In the case of cottage cheese yogurt egg cheesecake, the moisture comes from the sheer volume of liquid in the yogurt and the syrup, not just the fat content.
You can achieve a very creamy result with low-fat versions as long as you don't over bake the proteins into a dry brick.
Another myth is that you need a water bath for every cheesecake. While a water bath (bain marie) is great for preventing cracks in massive, 12 egg New York cheesecakes, this high protein version is much more forgiving.
The high moisture content of the cottage cheese acts as its own internal "steamer," keeping the environment inside the cake hydrated enough to resist cracking at a moderate 325°F (160°C).
Finally, many people believe you can't freeze cheesecake. You absolutely can. Because this recipe uses almond flour and a high protein dairy base, it actually holds its structure better than traditional flour based cakes after thawing.
The key is freezing it in individual slices so the moisture doesn't migrate and create ice crystals on the surface.
Freshness and Storage Tips
Storage: This cake is best stored in the refrigerator in an airtight container. It will stay fresh and hold its texture for up to 5 days. I actually find that the flavor "matures" on day two, as the lemon and vanilla have more time to permeate the dairy.
If you notice a little bit of liquid at the bottom of the container after a few days, don't worry that is just syneresis (natural moisture release from the yogurt) and can be dabbed away with a paper towel.
Freezing: To freeze, wrap individual slices tightly in plastic wrap and then place them in a freezer safe bag. They will stay good for up to 2 months. To eat, thaw a slice in the fridge overnight.
Avoid microwaving it to thaw, as the sudden heat will cause the egg proteins to seize and turn the cake rubbery.
Zero Waste: If you have leftover almond flour crust mix that didn't fit in the pan, don't throw it out! Toast it in a pan and use it as a "protein granola" topping for your morning yogurt.
Any leftover cottage cheese can be blended with a little cocoa powder and sweetener for a quick chocolate mousse that mimics the flavor profile of this cheesecake.
Serving Style and Pairings
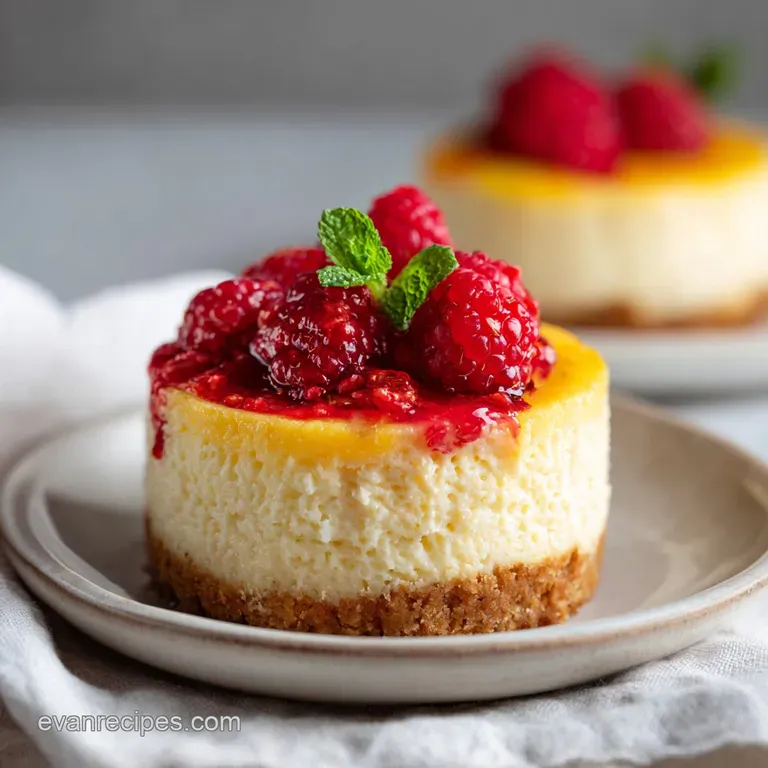
When it comes to serving, I love to play with temperatures and textures. A cold slice of this cottage cheese yogurt egg cheesecake paired with a warm berry compote creates a beautiful sensory experience.
Simply simmer some frozen raspberries with a splash of water and a tiny bit of sweetener until they break down into a thick sauce. The tartness of the berries highlights the lemon notes in the cheesecake perfectly.
For a more indulgent feel, a dollop of whipped coconut cream or a drizzle of almond butter can add a layer of healthy fats that makes the dessert feel more substantial. If you're serving this for a brunch or a party, a few sprigs of fresh mint and some shaved dark chocolate can turn this simple "health" bake into a centerpiece.
| Topping | Flavor Profile | Texture Add |
|---|---|---|
| Fresh Passionfruit | Tropical and sharp | Crunchy seeds |
| Toasted Pecans | Earthy and rich | Butter like snap |
| Balsamic Glaze | Savory and sweet | Syrupy finish |
Remember, this is a masterclass in balance. Whether you eat it plain as a high protein snack or dress it up for a dinner party, the goal is to enjoy the clean, bright flavors of the yogurt and egg cheesecake. Trust the jiggle, don't skip the blender, and you'll have a reliable recipe that works every single time.

Recipe FAQs
How to avoid a grainy texture in the cheesecake?
Process the cottage cheese in a high speed blender for a full 60 seconds. This ensures the curds are completely liquefied, creating the smooth, velvety base necessary for a professional finish.
Can I bake this without the almond flour crust?
Yes, you can omit the crust entirely for a crustless version. Simply pour the blended mixture directly into a parchment lined 8 inch springform pan and follow the standard baking time.
Is it necessary to bring the eggs to room temperature?
Yes, using room temperature eggs is crucial for proper emulsification. Cold eggs can cause the coconut oil to solidify prematurely or create lumps in your batter, preventing that perfect silky consistency.
How to tell when the cheesecake is finished baking?
Look for set edges that are pulling away from the pan while the center 2 inches retain a slight jiggle. If you enjoyed mastering the silky custard texture here, you will recognize these same visual doneness cues in other baked desserts.
Is it true the cake will deflate if I open the oven door too early?
Yes, this is a valid concern. Opening the oven door causes sudden temperature drops that can shock the structure, so keep the door closed until the final few minutes of the 45 to 50-minute bake time.
How long should the cake chill before serving?
Chill the cake in the refrigerator until it is completely cold, ideally for several hours. The structure relies on cooling to set properly, and the flavor profile actually improves after resting for up to 48 hours.
How to prevent air bubbles from ruining the top of the cheesecake?
Pulse the eggs into the mixture on the lowest blender setting only until the yellow disappears. Over blending at this final stage introduces excess air, which can cause the cheesecake to rise unevenly or crack while baking.
High Protein Cottage Cheese Cheesecake

Ingredients:
Instructions:
Nutrition Facts:
| Calories | 301 calories |
|---|---|
| Protein | 15.4 g |
| Fat | 18.3 g |
| Carbs | 21.5 g |
| Fiber | 2.6 g |
| Sugar | 14.3 g |
| Sodium | 275 mg |
