Chewy Hot Cocoa Cookies: Fudgy and Molten
- Time: Active 15 minutes, Passive 10 minutes, Total 25 minutes
- Flavor/Texture Hook: Fudgy, molten centered, and deeply chocolatey
- Perfect for: Holiday cookie exchanges or cozy winter nights
- Creating The Ultimate Chewy Hot Cocoa Cookies
- Why This Cookie Texture Works
- The Secrets Behind Our Ingredients
- Tools You Need For Success
- Step By Step Baking Guide
- Solving Common Baking Problems
- Customizing Your Cookie Batch
- Scaling the Recipe Up or Down
- Storage Tips For Freshness
- Best Ways To Serve Them
- Recipe FAQs
- 📝 Recipe Card
Creating The Ultimate Chewy Hot Cocoa Cookies
The moment you slide a tray of these cookies into the oven, the entire kitchen transforms. It starts with the heavy, dark scent of Dutch processed cocoa filling the air, followed closely by the sweet, toasted aroma of melting sugar.
When that 10 minute timer finally dings, the smell of warm vanilla and slightly charred marshmallows is enough to bring anyone running to the kitchen. It is a sensory experience that perfectly captures the essence of a steaming mug of cocoa on a freezing afternoon.
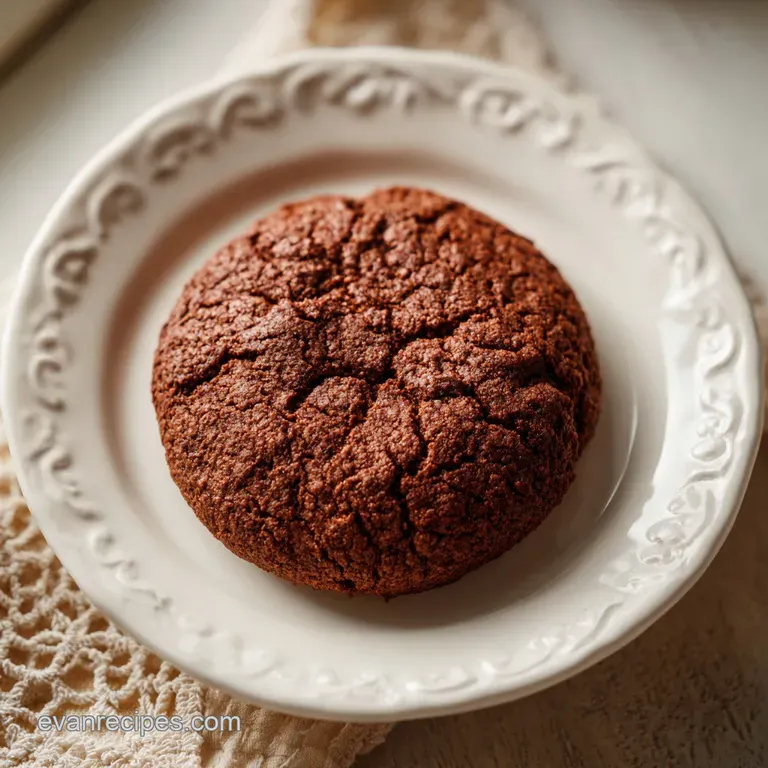
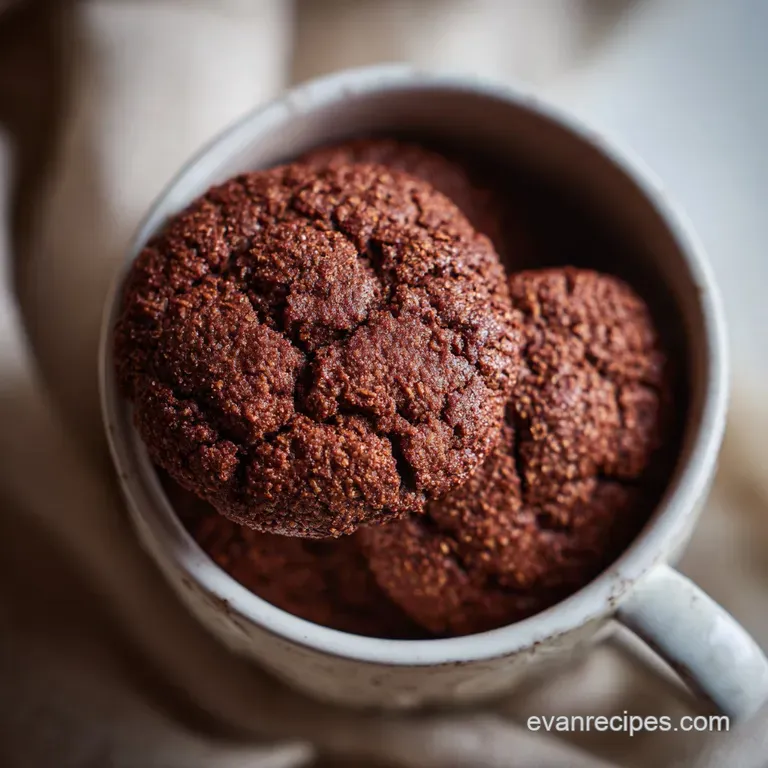
I remember the first time I pulled these off correctly. The edges were just crisp enough to hold their shape, while the center was a pool of white, gooey marshmallow lava. It was a revelation compared to those dry, crumbly versions that taste more like flour than chocolate.
The trick lies in the contrast between the cold marshmallow and the hot dough, creating a texture that feels luxurious and intentional. We aren't just making a chocolate cookie, we're building a masterpiece of temperature and texture.
You can expect a cookie that is remarkably dense and moist, thanks to the specific sugar ratios we've tested. These aren't your average bakery snacks that turn into rocks by the next morning. These chewy hot cocoa cookies stay soft for days, maintaining that signature "pull" that makes them so satisfying to eat.
We are using real chocolate chunks and a hint of espresso to make the cocoa flavor pop, ensuring every bite is rich, complex, and deeply comforting.
Why This Cookie Texture Works
Cold Center Insulation: Freezing the marshmallows for exactly 10 minutes before stuffing prevents them from liquefying and disappearing into the dough during the bake.
Hygroscopic Moisture Retention: The high concentration of dark brown sugar pulls moisture from the air, keeping the crumb soft and dense rather than cakey.
Fat to Flour Ratio: Using 170g of butter for 280g of flour creates a rich, short dough that spreads just enough to set the edges while keeping the middle fudgy.
Flavor Potentiator: Espresso powder doesn't add coffee flavor, but instead heightens the perception of chocolate by stimulating specific taste receptors.
| Method | Total Time | Resulting Texture | Best For |
|---|---|---|---|
| Standard Oven | 25 minutes | Crisp edges, gooey center | Classic individual cookies |
| Stovetop Skillet | 35 minutes | Ultra fudgy, brownie like | Sharing as a dessert |
| Air Fryer | 15 minutes | Extra chewy, dark exterior | Small batches for two |
Choosing the right method depends on your equipment, but for that specific marshmallow stuffed effect, the traditional oven is king. The consistent heat allows the dough to wrap around the cold marshmallow, sealing it in before it has a chance to leak out.
If you go the skillet route, you'll end up with a giant "cookie cake" style dessert that requires a spoon and maybe a scoop of vanilla ice cream.
The Secrets Behind Our Ingredients
The ingredients we use are selected for their chemical contributions as much as their flavor. We aren't just grabbing what's in the pantry, we are looking for specific reactions. For example, using dark brown sugar instead of light brown provides more molasses, which reacts with the baking soda to create a slight rise and a much deeper color.
| Component | Science Role | Pro Secret |
|---|---|---|
| Dark Brown Sugar | Provides acidity for rise | Pack it hard to ensure correct moisture |
| Hot Cocoa Mix | Adds milk solids and malt | Use a mix with mini marshmallows for extra goo |
| Espresso Powder | Enhances cocoa polyphenols | Bloom it in the vanilla for better distribution |
| Chocolate Chunks | Creates irregular fat pockets | Chop your own bars for better melting |
When you look at the 75g of instant hot cocoa mix, it might seem like a small addition, but it's the heart of the flavor. This mix contains dried milk and stabilizers that give the cookie a "creamy" mouthfeel that you can't get with just bitter cocoa powder. If you're interested in more unique textures, you might also like my Chewy Coconut Cookies recipe which uses a similar moisture lock technique.
Tools You Need For Success
You don't need a professional bakery kitchen to master this, but a few specific items make the process much smoother. A stand mixer is your best friend here because the creaming process requires consistent speed and power.
You're looking to aerate the butter and sugar for a full 3 minutes, which can be a real workout if you're trying to do it by hand.
A medium cookie scoop (about 2 tablespoons) is also vital for consistency. If your cookies are different sizes, they will bake at different rates, meaning some will have burnt marshmallows while others have raw dough.
Finally, a good quality baking sheet preferably heavy gauge aluminum will prevent the bottoms from scorching before the centers are set.
- Stand mixer with paddle attachment (or electric hand mixer)
- Two large baking sheets
- Parchment paper or silicone baking mats
- Whisk and large mixing bowl
- Small tray for the freezer
- Wire cooling rack
- Digital kitchen scale (highly recommended for the 280g flour)
step-by-step Baking Guide
- Preheat your oven to 350°F (175°C). Cut 12 large marshmallows in half horizontally and place them on a small tray in the freezer for 10 minutes. Note: This prevents the marshmallow from melting too fast.
- In a stand mixer, cream the 170g room temperature butter with the 200g dark brown sugar and 100g white sugar for 3 minutes until pale and aerated.
- Add the 2 large eggs one at a time, mixing well, then pour in the 10ml vanilla extract. Note: Room temperature eggs emulsify much better than cold ones.
- In a separate bowl, whisk together the 280g flour, 45g cocoa, 75g cocoa mix, 5g espresso powder, 5g soda, and 3g salt.
- Gradually add the dry ingredients to the butter mixture until no streaks of flour remain.
- Fold in the 170g semi sweet chocolate chunks using a spatula.
- Scoop a 2 tablespoon portion of dough, press a frozen marshmallow half into the center, and wrap the dough completely around it.
- Place the balls on the prepared baking sheet, spaced 2 inches apart.
- Bake for 10 minutes. The edges should be set but the centers will look slightly underdone and soft.
- Remove from the oven and immediately sprinkle with flaky sea salt while they sizzle and settle.
The scent during step five is one of my favorite parts of the process. As the dry ingredients hit the wet, the smell of the espresso and dark cocoa blooms, creating a rich, earthy fragrance that promises a sophisticated cookie. If you've ever made my Peanut Butter Balls recipe, you'll recognize that same satisfying moment when the dough finally comes together into a thick, glossy mass.
Solving Common Baking Problems
Even with the best intentions, baking can go sideways. The most common issue with these hot cocoa cookies is the marshmallow "escape." If the dough isn't sealed tightly or if the marshmallow isn't frozen, it will find a weak spot and leak out onto the pan.
This isn't a disaster it actually creates a delicious caramelized candy edge but it isn't the look we're going for.
Why Your Marshmallows Disappeared
If you bite into a cookie and find a hollow cavern instead of a gooey center, the marshmallow likely melted and was absorbed into the dough. This usually happens if the oven temperature is too low, causing the cookie to bake for too long, or if the marshmallows weren't frozen.
The flash freeze is the most important step for maintaining that distinct white center.
| Problem | Root Cause | Solution |
|---|---|---|
| Cookies are flat | Butter was too warm/melted | Chill the scooped dough for 30 mins |
| Bottoms are burnt | Dark pan or low rack | Use parchment and move to middle rack |
| Marshmallow leaked | Poor seal around the center | Ensure dough is tucked tightly under |
If your dough feels too crumbly to wrap around the marshmallow, it might be that your flour was measured by volume rather than the 280g weight. A quick fix is to add a teaspoon of milk to the dough to bring it back to a pliable consistency. Remember, we want the dough to feel like soft playdough, not dry sand.
- ✓ Always use room temperature butter for the 3 minute creaming stage.
- ✓ Never skip the 10 minute freezer prep for the marshmallows.
- ✓ Use a kitchen scale to measure the flour for perfect density.
- ✓ Leave space on the pan because these cookies will spread slightly.
- ✓ Let the cookies rest on the pan for 5 minutes before moving them.
Customizing Your Cookie Batch
While the classic version is hard to beat, there are ways to adapt this recipe for different needs. For example, if you want to make these gluten-free, a high-quality 1 to-1 flour blend works quite well because the cocoa powder and sugar provide most of the structure.
The result might be slightly more delicate, so handle them with care.
| Original Ingredient | Substitute | Why It Works |
|---|---|---|
| All Purpose Flour | 1:1 GF Flour Blend | Maintains structure. Note: May be slightly more crumbly. |
| Semi Sweet Chunks | White Chocolate Chips | High sugar content. Note: Makes the cookie much sweeter. |
| Large Marshmallows | Marshmallow Fluff | Very gooey. Note: Much harder to stuff and will spread more. |
For a festive twist, you could even try a "Peppermint Hot Cocoa" version. Simply add half a teaspoon of peppermint extract to the dough and top the finished cookies with crushed candy canes. The cooling peppermint against the deep, dark chocolate is a classic pairing that never fails to impress during the holidays.
Scaling the Recipe Up or Down
If you're baking for a big party, doubling this recipe is straightforward. However, when you go up to 48 cookies, I recommend keeping the salt and espresso powder at 1.5x rather than a full 2x to avoid overpowering the other flavors.
Liquids like vanilla should also be scaled carefully stay at about 15ml for a double batch.
For a smaller craving, you can halve the recipe easily. Since it calls for 2 eggs, just use one large egg and halve everything else. You will likely find that the bake time remains the same 10 minutes, as the size of the individual cookies isn't changing, just the number of them on the tray.
Storage Tips For Freshness
These cookies are at their absolute peak about 20 minutes after they come out of the oven, once the marshmallow has settled but is still warm. However, they store surprisingly well. Keep them in an airtight container at room temperature for up to 3 days.
To revive that gooey center, just pop one in the microwave for 8-10 seconds.
If you want to freeze them, do so after they have cooled completely. They will stay fresh in the freezer for up to 2 months. When you're ready for a treat, let them thaw at room temperature or warm them gently in a 300°F (150°C) oven for 5 minutes.
For zero waste, if you have broken cookies or crumbs, save them! They make an incredible topping for chocolate ice cream or can be folded into a vanilla cake batter for a "hot cocoa" marbled effect.
Best Ways To Serve Them
A chewy hot cocoa cookie is a star on its own, but the right pairing makes it an event. Obviously, a cold glass of milk is the traditional choice, but I love serving these with a sharp, tart raspberry coulis.
The acidity of the berries cuts through the intense richness of the dark cocoa and the sweet marshmallow center.
If you're feeling adventurous, try serving these alongside a small glass of barrel aged bourbon or a smoky black tea. The complex notes in the drink highlight the espresso powder and the molasses in the dark brown sugar.
Just remember to add that final sprinkle of flaky sea salt it’s the bridge that connects all those deep, sugary flavors and makes the chocolate truly sing. Don't overthink it; just get them while they're warm and the center is still stretchy. That is the magic of this recipe.

Recipe FAQs
How to keep the marshmallows from vanishing in the oven?
Freeze your marshmallow halves for at least 10 minutes before stuffing the dough. This temperature shock prevents them from liquefying completely before the cookie dough finishes baking.
Is it true I can use cold butter to save time?
No, this is a common misconception. You must use room temperature butter to properly cream it with the sugars for 3 minutes, which creates the essential pale, aerated structure needed for a chewy texture. If you enjoyed mastering the emulsification process here, that same fat-temperature logic applies to building structure in our brownie recipe.
How to store these for the best texture?
Keep them in an airtight container at room temperature for up to 3 days. If they lose their soft center, microwave an individual cookie for 8-10 seconds to restore that fresh baked gooeyness.
Can I bake these longer for a crunchier edge?
No, avoid baking longer than 10 minutes. The centers must remain soft when pulled from the oven to ensure the final cookie stays chewy rather than becoming dry or hard.
How to fix dough that feels too sticky to handle?
Chill the dough for 15-20 minutes before portioning. This firms up the butter and makes it significantly easier to scoop and seal the marshmallow centers without the dough clinging to your hands.
Why is the espresso powder included?
The espresso powder acts as a flavor enhancer for the cocoa. It does not make the cookies taste like coffee, but rather intensifies the deep chocolate profile of the cocoa powder and hot cocoa mix.
How to ensure the cookies stay chewy after freezing?
Thaw the cookies completely at room temperature or warm them gently in a 300°F oven. Cooling them fully before freezing prevents ice crystals from forming, which preserves the soft, chewy interior structure.
Chewy Hot Cocoa Cookies
Ingredients:
Instructions:
Nutrition Facts:
| Calories | 212 kcal |
|---|---|
| Protein | 2.7g |
| Fat | 8.8g |
| Carbs | 31.8g |
| Fiber | 1.4g |
| Sugar | 22.1g |
| Sodium | 146mg |
