Chicken Pot Pie and Bisquick Casserole
- Time: Active 10 minutes, Passive 30 minutes, Total 40 minutes
- Flavor/Texture Hook: A velvety, herb infused filling topped with a buttery, golden brown crust that shatters perfectly.
- Perfect for: Busy weeknight dinners for real families who need comfort food without the hours of prep.
- The Easiest Chicken Pot Pie and Bisquick Guide
- The Science of the Golden Rise
- Essential Recipe Performance Stats
- Understanding Your Core Components
- Kitchen Tools for Success
- Step-by-Step Cooking Process
- Fixing Common Baking Mistakes
- Clever Flavor Variation Ideas
- The Pie Crust Lie
- Smart Storage and Reuse
- Best Sides for Serving
- Recipe FAQs
- 📝 Recipe Card
The Easiest Chicken Pot Pie and Bisquick Guide
Right then, let's talk about that specific kind of hunger that only a warm casserole can fix. I remember one Tuesday when the rain was just hammering against the kitchen window, and the thought of rolling out a traditional pastry crust felt like a mountain I just couldn't climb.
I reached for that familiar yellow box in my pantry, and within ten minutes, the house smelled like a cozy pub.
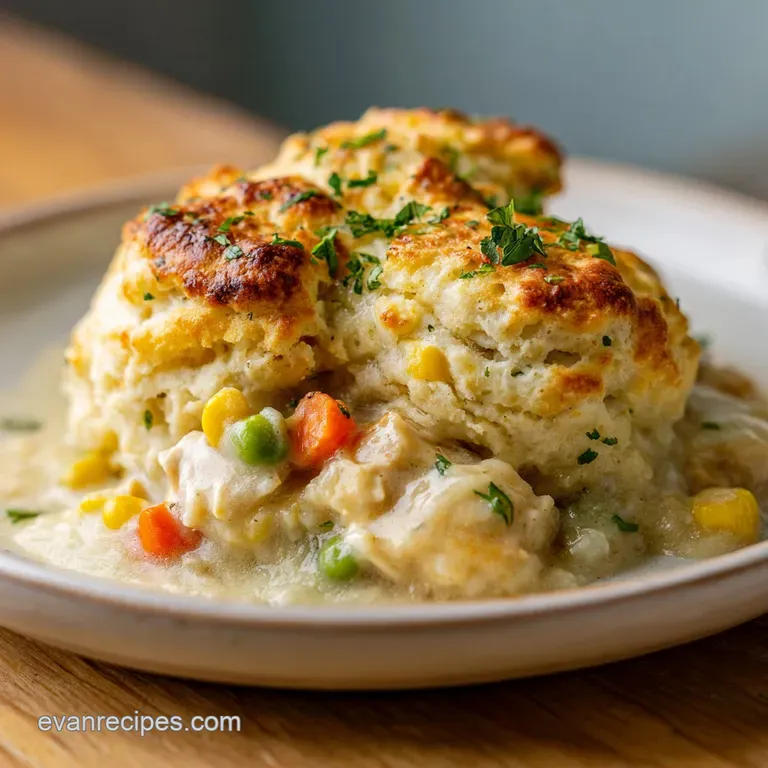
There's something incredibly satisfying about the way the thyme and black pepper hit the steam as you pull this dish out of the oven. It isn’t just about speed; it’s about that specific, sponge like topping that soaks up just enough of the savory gravy to stay tender while the top gets that signature crunch.
You’ll find that this version is much lighter than a heavy double crust pie, making it a staple for when you want a hearty meal that doesn’t leave everyone needing a three hour nap.
We've all been there with a "shortcut" recipe that tastes, well, like a shortcut. But trust me on this, with a few small tweaks like using melted butter and a pinch of extra herbs you can make this taste like it took you all afternoon.
It’s brilliant, it’s reliable, and it’s going to be your new best friend on those nights when the fridge looks bare but the family is starving.
The Science of the Golden Rise
The Steam Lift: When the liquid in the batter hits the hot filling, the leavening agents react with the eggs to create tiny air pockets that expand rapidly, ensuring the crust stays airy rather than dense.
The Starch Gelation: The flour in the mix absorbs the moisture from the milk and soup, setting the structure so it doesn't sink into the filling, maintaining a distinct boundary between "crust" and "gravy."
| Method | Prep Time | Ingredient Cost | Result Texture |
|---|---|---|---|
| Fresh/Scratch | 45 minutes | Higher | Flaky and dense |
| Bisquick Shortcut | 10 minutes | Lower | Light and sponge like |
Choosing the shortcut method doesn't mean sacrificing the "home cooked" feel. In fact, many families prefer the softer, more biscuit like texture of this version over the often greasy bottom crust of a traditional pie. If you're looking for more ways to simplify your week, you might also enjoy the efficiency of my Chicken Stir Fry recipe, which uses similar time saving techniques.
Essential Recipe Performance Stats
Before we get the oven preheated, let's look at what we're actually building. This dish is designed for a standard 9x13 inch baking dish (about 33x23 cm), which gives you the perfect surface area for that golden topping.
If you use a deeper, smaller dish, the crust might turn out too thick and doughy in the middle, so stick to the wider pan if you can.
Why use a 9x13 pan?
Using a larger pan increases the surface area for the topping. This means more of those crispy, buttery edges that everyone fights over. It also allows the filling to heat through more evenly, ensuring you don't end up with a boiling center and cold edges.
How do eggs change the topping?
Adding two large eggs to the baking mix is what separates a flat biscuit from a proper "Impossible" style topping. The proteins in the eggs provide the necessary structure to support the rise, preventing the batter from simply dissolving into the cream of chicken soup.
| Component | Science Role | Pro Secret |
|---|---|---|
| Bisquick Mix | Structural base | Don't overmix to keep it tender |
| Large Eggs | Protein binder | Beat them well before adding milk |
| Melted Butter | Fat for browning | Use unsalted to control the sodium |
| Condensed Soup | Emulsified base | Whisk it with milk for a silky finish |
I've found that the brand of soup doesn't matter as much as how you treat it. If you just plop it in, you'll get clumps. Whisking it with that half cup of milk before adding the chicken makes the filling truly velvety.
Understanding Your Core Components
This recipe relies on pantry staples that most real families keep on hand. The beauty of it lies in the balance between the salty soup base and the slightly sweet, buttery topping. Here is what you will need:
- 3 cups cooked chicken breast: Shredded or cubed. Why this? Using pre cooked chicken ensures the meat stays tender and doesn't release excess water.
- 2 cups frozen mixed peas, carrots, and corn: Straight from the freezer. Why this? They provide a pop of color and sweetness without needing pre cooking.
- 21 oz condensed cream of chicken soup: Two 10.5 oz cans. Why this? It provides the thick, savory gravy base without needing a roux.
- 0.5 cup whole milk (for filling): To thin the soup slightly.
- 0.5 tsp onion powder: For a savory depth without the texture of raw onions.
- 0.5 tsp dried thyme: The classic "pot pie" herb.
- 0.25 tsp cracked black pepper: Adds a necessary bite.
- 1.5 cups Bisquick baking mix: The foundation of our crust.
- 1 cup whole milk (for topping): To hydrate the mix.
- 2 large eggs: For lift and structure.
- 4 tbsp unsalted butter, melted: For that rich, golden finish.
- 0.5 cup sharp shredded cheddar cheese: Folded into the topping or sprinkled on top.
| Original Ingredient | Substitute | Why It Works |
|---|---|---|
| Cream of Chicken Soup | Cream of Mushroom | Similar thickness. Note: Adds an earthy, umami depth to the filling. |
| Frozen Mixed Veg | Leftover Roasted Veg | Already seasoned. Note: Gives a more rustic, charred flavor. |
| Whole Milk | Heavy Cream | Higher fat content. Note: Makes the filling much richer but increases calories. |
If you find yourself missing an ingredient, don't panic. The structure of this dish is very forgiving. For instance, if you are out of chicken, you could use turkey leftovers, similar to the method used in my Bisquick Chicken Pot recipe.
Kitchen Tools for Success
You don't need fancy gadgets for this one, but a few specific items make the process smoother. A large mixing bowl for the filling and a medium one for the topping are essential. I highly recommend using a whisk for the topping to ensure no lumps of baking mix remain.
A 9x13 inch glass or ceramic baking dish is the gold standard here. Glass is particularly great because you can peek at the sides to see if the filling is bubbling, which is your best indicator that it’s done. If you're using a metal pan, just keep an eye on it as it might brown the edges a bit faster.
step-by-step Cooking Process

Preheat your oven to 200°C (400°F). While that’s heating up, grab your baking dish. You don't necessarily need to grease it because the butter in the topping helps with sticking, but a light spray doesn't hurt.
- Mix the filling. Combine the 3 cups of chicken, frozen vegetables, both cans of soup, half cup of milk, onion powder, thyme, and pepper in your baking dish. Note: Mixing directly in the dish saves you from washing an extra bowl.
- Spread it evenly. Smooth the filling out with a spatula so it's a flat layer.
- Prepare the topping. In a separate bowl, whisk together the 1.5 cups of Bisquick, 1 cup of milk, and 2 eggs.
- Add the fat. Stir in the 4 tbsp of melted butter until the batter is smooth. Watch for a silky, pourable consistency.
- Fold in cheese. Gently stir the half cup of cheddar into the batter.
- The Inverse Pour. Pour the batter slowly over the top of the chicken mixture. Cover the surface as evenly as possible.
- Do not stir. Leave the batter sitting on top; do not mix it into the chicken layer.
- Bake the pie. Place in the center of the oven and bake for 30 minutes. Look for a deep golden brown and bubbling edges.
- The Rest. Remove from the oven and let it sit for 5 to 10 minutes. Note: This allows the filling to set so it's not a runny mess when you scoop it.
| Problem | Cause | Fix |
|---|---|---|
| Runny Filling | Too much milk added | Reduce milk by 2 tbsp next time |
| Pale Crust | Oven temp too low | Ensure it hits 200°C before baking |
| Soggy Middle | Pan was too deep | Use a wider 9x13 inch baking dish |
Letting the dish rest is the hardest part because it smells so good, but it's vital. The starches in the soup need a moment to firm up as the temperature drops slightly, otherwise, the filling will run all over the plate.
Fixing Common Baking Mistakes
One thing that used to frustrate me was the "sunken crust." I’d pull the pie out, and the middle would be dipping down into the chicken. I learned that this usually happens if the filling is too cold when it goes in.
If you’re using chicken straight from the fridge, try letting it sit on the counter for 15 minutes while you prep everything else.
The Cause of Runny Filling
If your pot pie feels more like soup than a casserole, the culprit is usually over measuring the milk in the filling. Those two cans of soup are quite thick, and while the half cup of milk makes it creamy, going even a splash over can tip the balance. Always measure precisely!
Addressing a Dry Crust
Sometimes the top can look a bit dry or floury. This happens if the Bisquick wasn't fully incorporated with the milk and eggs. Make sure you whisk until you see no more white streaks of flour. Adding that melted butter into the batter also helps significantly with the texture and browning.
| Problem | Root Cause | Solution |
|---|---|---|
| Crust is too doughy | Topping was too thick | Add a tablespoon of milk to the batter next time |
| Burnt edges | Oven has hot spots | Rotate the pan halfway through the 30 minute bake |
| Veggies are hard | Used large fresh chunks | Cut fresh veggies very small or use frozen |
Common Mistakes Checklist
- ✓ Always preheat the oven fully; a cold start leads to a flat, dense crust.
- ✓ Don't overmix the batter once you add the butter treat it like pancake mix.
- ✓ Check that your baking mix hasn't expired, as the leavening agents lose power over time.
- ✓ Use a 9x13 pan to ensure the filling boils enough to cook the bottom of the crust.
- ✓ Let the dish rest for at least 5 minutes before serving to let the sauce thicken.
Clever Flavor Variation Ideas
Once you have the base down, you can really start to play with the flavors. One of my favorite tweaks is to add a tablespoon of Dijon mustard to the filling. It adds a tang that cuts right through the richness of the cream soup.
Can I make this a "Cheddar Bay" inspired version?
Absolutely! Add half a teaspoon of garlic powder to the batter and increase the cheddar to a full cup. When it comes out of the oven, brush the crust with a little extra melted butter mixed with dried parsley. It tastes just like those famous restaurant biscuits.
Vegetarian Ingredient Swap Options
You can easily swap the chicken for chickpeas or extra hearty vegetables like mushrooms and cauliflower. Just make sure to use "Cream of Mushroom" or "Cream of Celery" soup instead of the chicken version to keep it fully vegetarian friendly.
| Serving Size | Ingredient Adjustments | Pan Size | Cook Time |
|---|---|---|---|
| 4 People | Halve all ingredients | 8x8 inch square | 25 minutes |
| 8 People | Follow recipe exactly | 9x13 inch | 30 minutes |
| 12 People | 1.5x all ingredients | Two 9x13 pans | 35 minutes |
If you are cooking for a larger crowd, don't try to double the recipe in one pan. The depth will prevent the middle from cooking. It's always better to use two separate dishes and bake them side-by-side.
The Pie Crust Lie
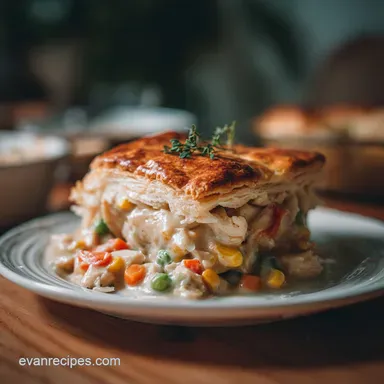
One of the biggest myths in the kitchen is that a "real" pot pie must have a bottom crust. Honestly, unless you're a professional pastry chef, a bottom crust often ends up soggy and undercooked because it’s trapped under all that heavy filling.
By using this Bisquick method, you get all the flavor of the breading without the "soggy bottom" heartbreak.
Another myth is that frozen vegetables are inferior. In a long bake dish like this, frozen veggies are actually superior because they are flash frozen at peak ripeness and won't turn into complete mush like canned vegetables or poorly prepped fresh ones might.
Smart Storage and Reuse
This casserole is a dream for leftovers. You can keep it in the fridge for up to 4 days. When reheating, I suggest using the oven at 175°C (350°F) for about 15 minutes rather than the microwave.
This helps the crust regain some of its original texture instead of becoming rubbery.
For freezing, it's best to freeze the filling and the topping separately if you're making it ahead. However, you can freeze the whole baked dish for up to 3 months. Just wrap it tightly in a double layer of foil to prevent freezer burn.
Zero Waste Tip: If you have small amounts of other leftover vegetables in the fridge like a few spears of asparagus or half an onion chop them finely and toss them into the filling. It's a great way to clear out the crisper drawer.
Also, save your chicken carcasses to make a stock that you can use instead of milk in the filling for an even deeper flavor.
Best Sides for Serving
Since this is a pretty heavy, "all in-one" meal, I usually keep the sides very simple. A crisp green salad with a sharp vinaigrette is the perfect contrast to the creamy filling. I often serve it with a side of steamed broccoli or roasted green beans to add a bit of freshness to the plate.
If you're serving this for a crowd, it pairs beautifully with a fruit salad or even just some extra crusty bread for those who want to scoop up every last drop of the gravy. It's a hearty, family friendly meal that feels like a big hug on a plate. If you find yourself with extra chicken and want something different next week, check out my Chicken and Wild recipe for another cozy option. Whether you're feeding a family of four or a hungry group of six, this dish always delivers.

Recipe FAQs
What are some common mistakes to avoid when making chicken pot pie (Bisquick version)?
Don't use a deep, small pan. Use a 9x13 inch dish to ensure the filling boils adequately and cooks the bottom of the crust evenly.
What to add to chicken pot pie filling for more flavor beyond the standard ingredients?
Add a tablespoon of Dijon mustard. This cuts through the richness of the cream soup by adding a necessary tang and depth to the savory base.
How do you keep the bottom layer of a Bisquick chicken pot pie from getting soggy?
Use a wide, shallow baking dish like a 9x13 inch pan. The goal is maximizing surface area so the filling heats evenly and the bottom crust steams rather than sits in pooled liquid.
What is Oprah's favorite chicken pot pie?
This specific information is not recorded in culinary data sources. However, many home cooks prefer the convenience and texture of shortcut recipes like this one over traditional double crusted pies.
Should I let the filling ingredients cool down before pouring the Bisquick batter over them?
No, pour the batter over hot filling. The rapid temperature difference when the cold batter hits the hot filling activates the leavening agents quickly, giving you maximum lift and an airy crust.
Can I substitute turkey for the chicken in this Bisquick recipe?
Yes, substitute with cooked turkey immediately. The method works perfectly with leftover turkey; if you enjoyed mastering the technique of balanced ratios here, see how the same principle applies when adapting recipes in our Sopapilla Cheesecake Recipe.
How do I make the Bisquick topping taste more savory and less like plain biscuits?
Fold half a cup of sharp cheddar cheese into the batter before pouring. Also, ensure you are using plenty of black pepper and thyme in the filling to flavor the steam rising into the crust.
Bisquick Chicken Pot Pie 2
Ingredients:
Instructions:
Nutrition Facts:
| Calories | 374 calories |
|---|---|
| Protein | 24.6 g |
| Fat | 19.2 g |
| Carbs | 25.8 g |
| Fiber | 2.1 g |
| Sugar | 5.4 g |
| Sodium | 785 mg |
